
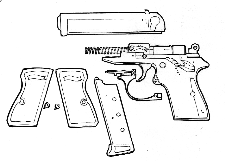
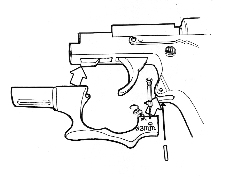
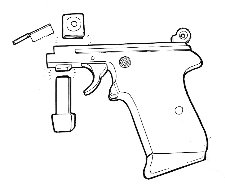
 (1)マルゼン・ワルサーPPK/S(固定スライドモデル)を分解します。
(1) Take a MARUZEN Walther PPK/S (fixed slide model) apart to pieces
Pull out the magazine.
.
Take off the butts.
Pull the pin out of the trigger guard.
Take off the trigger guard.
Pull the slide and pull up the end of it.
Pull it forward and put the slide out of the frame.
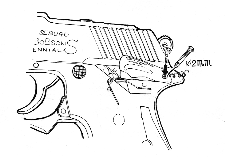
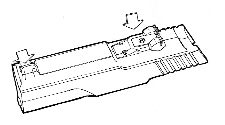
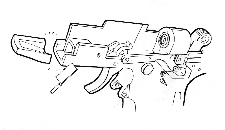 (2)フレームの全部を18ミリ切り取ります。フレームの前方にあるコの字型の金属プレートが左図のようになっていない場合(新しいバージョン)、この金属プレートを取り除きます。
(2) Cut off forepart of the frame for 18mm.
The metalic part on the front part of frame if it is not the same shape
as left picture. Then remove it.
 (3)キット表面に付いている離型(油分)を落とします。専用の離型剤剥離剤か、クリームクレンザーで洗い落とします。
(3) Completely remove oil stain of a mold release on the kit.
To use remover or to wash with a toothbrush etc. by mixing cleanser
and neutral detergent.
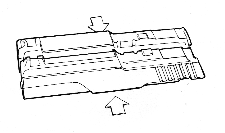
Cut off the parts as left picture and make sections smooth with sandpaper.
Remove extra tabs.
Fill in bubbles. Use suitable putty for every parts .
 (4)スライドを組み立てます。タボに従ってエポキシ系接着剤で接着します。接着面は荒いペーパーなどで荒らしておくと接着力が上がります。できれば、真鍮線等で補強を入れてください。
(4) Assemble the slide.
Glue it putting a projection together with epoxie glue.
Before glueing, make the surface rough by sandpaper.
It will glue better.
Reinforce the slide with brass wire.
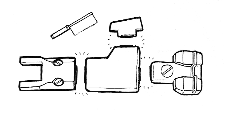
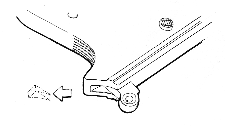
 (5)トリガーガードをフレームに付けた状態で、接合用のピンの穴(3ミリ)を開けて、ピンで固定します。
(5) Assemble the trigger guard.
Drill a hole 3mm in diameter and fixed by a pin.
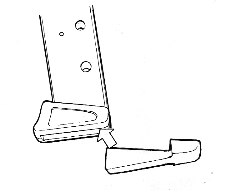 (6)マガジンアダプターを接着します。隙間はエポパテ、ポリパテで埋めて下さい。
(6) Glue the magazine base.
Fill in a gap with epoxie putty or polyethylene putty.
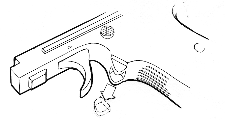
 (7)セフティを組み込みます。作動するのは左のみ。右はダミーです。
(7) Put in the safety catch.
Only left one works. Right one is a dummy.
Assemble the slide temporarily.
Drill a hole 2mm in the left safety catch.
The left safty has a projection inside.
Fit it in the depression of the slide.
Screw the left safety with a wood screw.
 (8)左グリップをPPK/Sのネジで止めます。右グリップに右セフティを接着してからネジ止めします。
(8) Screw the left butt with the screw of MARUZEN PPK/S.
Glue the right safety on the right butt and screw it same way.
You can make the right safety to work.
Drill a hole through the frame of MARUZEN PPK/S.
Connect the left safety to right one by brass wire.
Test to work together right and left.
(9) Take off the slide.
Assemble the barrel and the spring on the frame.
Assemble the slide.
 (10)サイトを取り付けます。サイトは別パーツにしてありますから、フロントは左右、リアは上下に調整することができます。仮止めして試射をし、調整した後に瞬着で固定します。リアは真鍮線を通し、タッピングビスとバネでアジャスタブルにするのもおもしろいでしょう。
(10)Fix a front sight and a rear sight on the slide temporarily.
Test shooting and adjust the both sights.
Glue them.
How to make an adjustable rear sight.
Through brass wire in the rear sight.
Then use a tapping screw and a spring.
Please try to make it working.
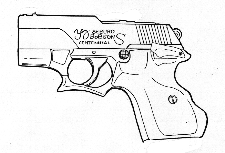
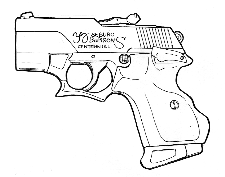 (11)完成。
(11)You have finished assembling.
(1) Completely remove oil stain of a mold release on the kit.
To use remover or to wash with a toothbrush etc. by mixing cleanser
and neutral detergent.
(2) Cut off a frame, a muzzle and a magazine base from the kit.
Scoop the frame for the end of trigger guard with chisels or knives.
Carve the back of the hammer.
Drill the hole of the hammer 3mm in diameter.
(3) Glue the trigger guard.
Fill in a gap with putty.
(4) Fix each safety catches on both side butts.
Glue the butts on the frame.
Fill in the screw holes of the butts or attach screws to there.
( This kit doesn't have the screws.)
5)スライド左右を接着、バレル先端を取り付けて接着します。フレームに組み付けて接着。サイトを接着して完成。
(5) Glue the slide left side and right together.
Attach the muzzle to the slide.
Glue the slide on the frame.
Glue the front sight and rear sight.
You have finished assembling.